How Long to Run a Pool Pump in Florida (the Real Answer)
How long to run a pool pump in Florida: 8-10 hours in summer for single-speed, near-continuous low RPM…
Read more →
Pool leak detection starts with a bucket, not an invoice. Half of suspected Florida pool leaks are evaporation — our summer heat pulls a startling amount of water out of an open pool — and a free overnight test settles the question before you spend a dollar. If it is a leak, another hour of detective work usually narrows it to one of four or five usual suspects. Here’s the whole investigation, in the order a leak tech would run it.
The classic, and still the best first move:
Calibrate your expectations first: a Florida pool in high summer legitimately evaporates up to a quarter-inch a day and more — hot water, dry breeze, screen cage or not. An inch a week in July is weather, not damage. An inch a day is a leak, no test needed.
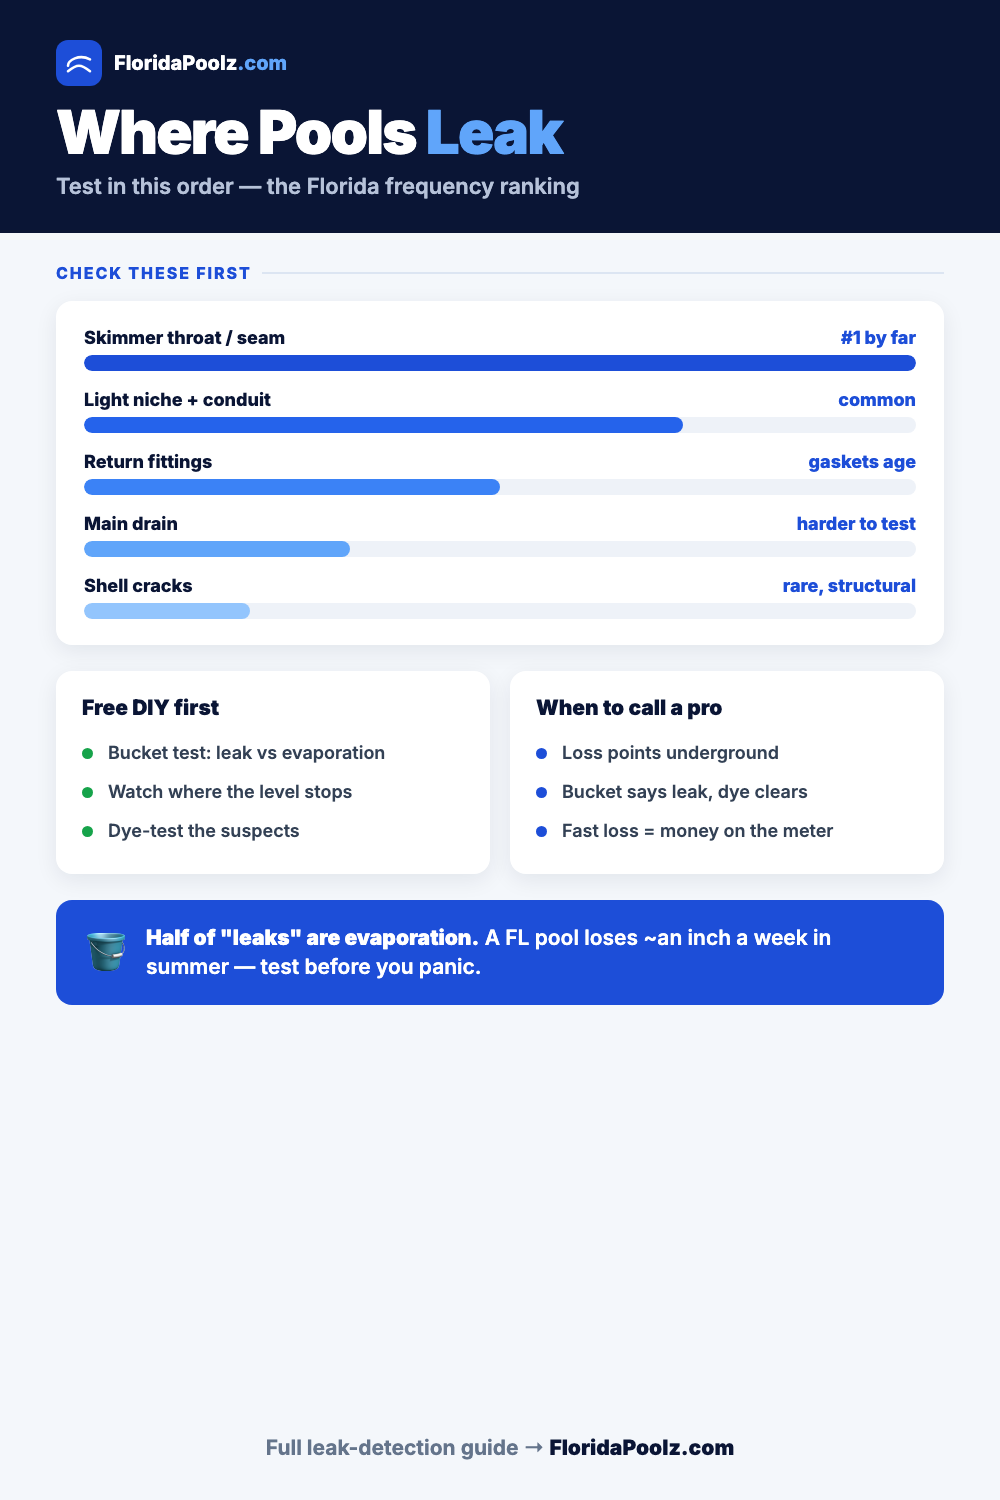
Where the water stops dropping is the biggest free clue: a leak can only drain a pool to the level of the leak itself. Water that always stabilizes just below the skimmer mouth points at the skimmer; a stop at the light ring points at the light niche; a pool that keeps falling toward the floor implicates the main drain or floor plumbing. Note the level and mark it — you’ve cut the search area by half.
The equipment pad testifies too:
With the pump off and the water dead still, a few drops of leak-detection dye (food coloring works in a pinch) released slowly near a suspect spot will drift toward a leak like smoke toward a cracked window. Test in this order — it’s the Florida frequency ranking:
Patchable finds — a skimmer seam, a fitting gasket, a small shell crack — are honest DIY territory with pool-grade epoxy or a gasket swap. Anything involving the niche conduit, buried pipe, or structural cracking is where the amateur portion of the investigation ends.
A professional leak detection visit brings three things you can’t rent easily: pressure testing that isolates each plumbing run and says definitively which pipe leaks; listening equipment (hydrophones, geophones) that hears water escaping underground and marks the dig spot within inches; and experience with Florida’s specific failure patterns — deck movement, water table pressure, the works. The visit typically prices as a flat diagnostic fee, credited toward the repair by many outfits — ask when booking.
Book the pro when: the bucket test says leak but dye testing clears the accessible suspects; the clues point underground or at the main drain; or the water loss is fast enough that every week of DIY guessing costs real money on the water bill. Verify any outfit’s license on the state’s DBPR portal before they cut concrete — and the directory’s Florida leak specialists are pre-verified on exactly that.
Worth knowing before you panic at a wet spot: our pools live in conditions that manufacture leaks. Decks expand and contract daily under sun cycles, working every shell penetration (skimmer, returns, light) year-round. The high water table pushes up against shells in rainy season — hydrostatic pressure that finds weak joints from the outside. And after a hurricane’s deluge, ground movement shows up as brand-new leaks weeks later. A pool that starts losing water in the months after a major storm isn’t a coincidence; it’s a pattern every Florida leak tech knows.
One flip side worth naming: a pool that gains unexplained water in rainy season can have groundwater intruding through the same failed joints — equally a repair, differently urgent.
Summer evaporation runs a quarter-inch or so a day — roughly 1.5–2 inches a week in the brutal months, less in winter, less under a tight cage. Loss beyond that pace, confirmed against a bucket, is a leak.
Yes, and it’s a useful signature: pressure-side plumbing (pump to returns) leaks hardest under pump pressure. The reverse pattern — loss that stops when the pump runs — implicates the suction side. Run the bucket test both ways to catch it.
The skimmer-to-shell joint first, by a wide margin, then the light niche and its conduit, then return fittings. True structural shell leaks are the rare case; plumbing and penetrations are the norm, which is good news — they’re the cheaper end of the repair menu.
Pressure-isolate each plumbing line to identify the leaking run, then acoustic listening gear to pinpoint the escape along that run. A good tech marks a dig spot within a foot — you pay for the equipment and for not excavating three wrong holes.
The pour-in sealers can close pinhole plumbing seeps and buy time, and they can just as easily gum up nothing or settle in the wrong place. Fair as a stopgap on a slow plumbing leak before a scheduled repair; a poor bet on fittings, skimmers, or anything structural. Nothing in a bottle fixes a moving joint.

We build Florida's pool contractor directory from county permit records, DBPR license data, and verified Google reviews — and write these guides from the same data, with input from the licensed builders and service pros listed on the site.
Straight-talking, Florida-specific help — written from permit data and local pros.
How long to run a pool pump in Florida: 8-10 hours in summer for single-speed, near-continuous low RPM…
Read more →
DIY pool heater reality check: solar covers and rings deliver real degrees for cheap, coil rigs mostly don't,…
Read more →
How to lower pH in a pool with muriatic acid: dose amounts by pool size, safe handling steps,…
Read more →